Last Updated: June 30, 2026
This comprehensive guide walks you through the complete process of building raised beds for vegetable growing, with step-by-step photo instructions suitable for beginners and DIY gardeners of any skill level. Whether you want easier access to your crops, better soil drainage, or a more organised garden layout, this practical tutorial shows you exactly how to construct durable raised beds using basic tools and materials.
I hope you will see that building raised beds will be a great investment of time and effort. Certainly the aim of this page is to show you that it is not rocket science and I am certainly no carpenter – that will become evident… please only send me encouraging comments ;-).
Building raised beds in my garden has been the best decision I have made – except for marrying Ros – I haven’t admitted that yet… so that’s just between you and me. It has certainly made life easier and planning the beds layer-out for the crops I am going to grow is a no-brainer.
So! I hope these pictures will inspire you to have a go at building raised beds. Don’t forget these are only guidelines. You can adapt what you see here – make the beds shorter, shallower, deeper. Use different materials or even put them on legs (make sure the supports are sturdy enough to hold the weight) if you or someone you know has a physical disability – just doing this will be a great experience for someone to enable them to grow their own vegetables.
According to the Royal Horticultural Society (RHS), raised beds can increase vegetable yields by up to 1.4 to 2 times compared to traditional row planting, primarily due to improved soil structure and the elimination of soil compaction from foot traffic.
Setting Out the Ground Plan for Your Raised Bed Construction
Once you have decided where to place your raised bed then all you will require for the ground works is: something to measure with, two lengths of wood to run string between (have 4 pairs available), a garden spade, a garden fork, a wheel barrow and if you’re really keen like me, a set square to make the corners – but ‘guestimation’ (guess and estimate) should be ok.
 |
 |
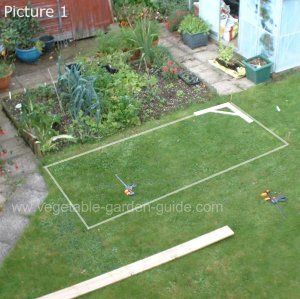
Marking Out the Raised Bed Location – Picture One
This picture shows where I have decided on building raised beds in my garden. I have placed a string along the grass parallel with the old flower bed (I will make that bed the same later). I have used my graphics progam to outline the rectangle – if it looks a bit un-rectangular-ish then my apologies… but you get the idea (I hope).
I have used the wooden square to get the right angle for one narrow end and then I will do the same for the other end. To get the rectangle I will run a fourth string to either end of the short sides.
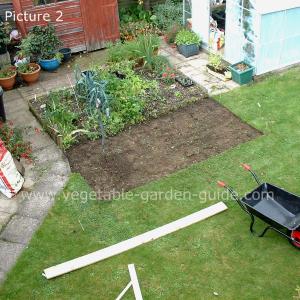
Removing Turf and Preparing the Ground – Picture Two
Once I have established the shape of the raised bed it is time for me to remove the turfs. This part of building raised beds is the only really physical part. I will stack the turfs upside down in the garden somewhere and let them rot and break down as they will make a nice loam to put back into my vegetable patches some time.
Using the blade of my garden spade I dig into the ground around the perimeter of my new raised bed and then cut the grass into squares to make it easier to lift. I then slice these grass squares out of the ground by pushing the blade under the grass squares and lifting.
 |
 |
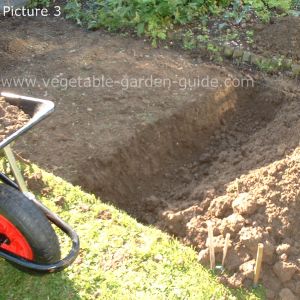
Breaking Up Compacted Soil with a Garden Fork – Picture Three
The soil beneath my grassed area will be very compacted which is not good for vegetable growing. So whilst building raised beds here I will use my garden fork to dig the area I am turning into the raised bed before I actually construct it. This will have been well worth the efort as, once these two raised beds are completed, I have no intention of digging them again – ever!
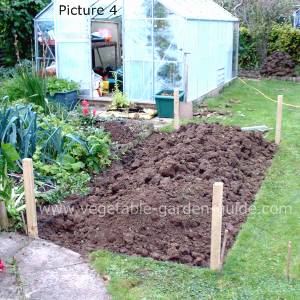
Understanding Soil Compaction and Installing Corner Posts – Picture Four
You can observe the extent of the compaction by how much the mass of soil has increased. This is a good indication of how the soil drainage would be impaired and how little air would be able to circulate in the soil. This danger is present when growing vegetables in the row system and you have to walk on the soil to tend your vegetable plants.
As far as I’m concerned, I don’t want to break my back digging in winter and then ruin my hard work in spring and summer by having to walk on the soil – no sir!
I have also now driven in the corner posts which better defines my new raised bed.
 |
 |
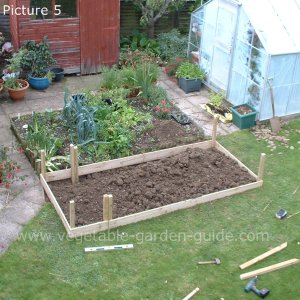
Attaching Wooden Sides to the Raised Bed Frame – Picture Five
This is where the raised bed begins to take shape. For this part of building raised beds you will require a power screwdriver or a hand held one, a wood saw, a hammer if nails are used, a spirit level if you’re picky like me 🙂 and of course, some wood.
Measure the wood to fit between the raised bed corner posts and if necessary drive some more posts in to strengthen the sides or to enable extra lengths of wood to be fitted. My preference is to use coated wood scews but nails will do equally well to attach the sides.
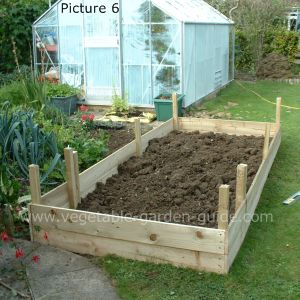
Completing the Raised Bed Structure – Picture Six
This shows the finished bed and all that is left to do is saw off the posts at the hight you intending having the raised bed.
 |
 |
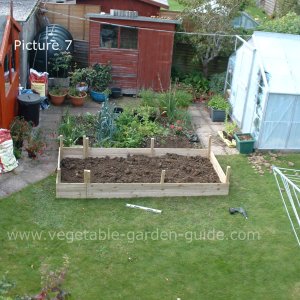
Birds Eye View Showing Level Construction – Picture Seven
This picture is just giving you a birds eye view of the raised bed. You can see why I used a spirit level, it was because the garden lawn slopes slightly and I didn’t want the soil to fall out…. only kidding :0).
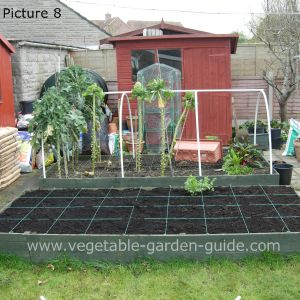
Finished Raised Beds After One Year in Service – Picture Eight
This picture shows both beds having been finished and treated with a plant friendly preserver. At this point they had been in service for a year.
 |
 |
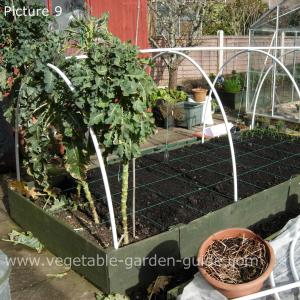
Spring Preparation and Adding Compost – Picture Nine
Picture nine was taken in April and shows the bed has been partially prepared for the coming vegetable growing season. Purple sprouting Broccoli is still being picked and, more importantly, eaten mmmmm.
The preparation consisted of me lightly forking the surface, removing plant debris to the compost heap and then topping up the bed with my compost from the compost bins. Phew! I had quite a sweat on – it must have taken all but 45 minutes ;-).
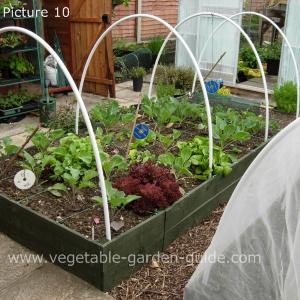
Growing Vegetables and Crop Rotation Benefits – Picture Ten
This picture was taken during my new raised beds first year in use.
You can see the Purple Sprouting Broccoli as young plants (the mature plants are in picture nine). I grew good crops of Brussels Sprouts, Kale, Onions, Parsnips, Beetroot, Leeks. Whilst the larger vegetables were growing to maturity I grew catch crops of Lettuce, Radish, Spring or Salad Onions.
Building raised beds also make it much easier to rotate the beds so the same crop is not sown in them each year. This helps reduce the build up of pests and diseases in the soil.
As you can observe it also makes it possible to easily construct a frame to cover the raised bed and either increase the growing season with plastic sheeting or protect against pests by covering with netting.
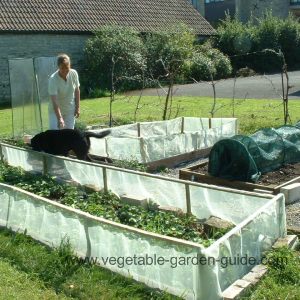
Well just before I go here is another example of a raised bed system.
I visited Mrs D to fix her dishwasher (I’m an appliance engineer) and took advantage of the fact she had her own raised beds by taking a photo – I always carry a camera in my van for such occassions.
Mrs D has put a fence of some fine netting or maybe it’s fleece – oops can’t remember what it was. Its purpose is to fend off pests such as carrot root fly.
As you can see from the picture there are lots of ways to utilise raised beds by adding tunnel cloches for protection or if the cloches were covered in polythene they can be used to warm up the soil or plant crops earlier.
In the background a tall mini-green house type structure can be observed sitting on part of one of the beds.
Well that’s it for now – I hope you give building raised beds a go or get someone to build one or two for you… it really will enhance your vegetable growing experience.
Article source: https://www.vegetable-garden-guide.com/building-raised-beds.html
Frequently Asked Questions About Building Raised Beds
What is the best wood to use for building raised beds?
The best woods for raised beds are naturally rot-resistant options such as cedar, larch, or oak, which can last 10-15 years without treatment. If using softwood like pine or spruce, ensure it is treated with a plant-friendly wood preserver to extend its lifespan. Avoid using railway sleepers or wood treated with creosote, as these can leach harmful chemicals into your vegetable growing soil.
How deep should a raised bed be for growing vegetables?
Most vegetables grow well in raised beds that are 15-30cm (6-12 inches) deep, though deeper beds of 30-45cm (12-18 inches) are beneficial for root vegetables like carrots and parsnips. The depth you choose depends on the quality of your underlying soil—if it is very compacted or poor quality, deeper beds allow roots to grow entirely within the improved soil. For accessibility purposes, beds can be built higher on legs or supports.
What is the ideal width for a raised bed?
The ideal width for a raised bed is 1.2 metres (4 feet) or less, which allows you to comfortably reach the centre from either side without stepping on the soil. This prevents soil compaction and maintains the improved soil structure that makes raised beds so effective. If the bed is positioned against a wall or fence, limit the width to 60cm (2 feet) so you can reach all areas from the accessible side.
Do I need to line my raised beds with anything?
Lining raised beds is optional but can extend the life of wooden frames by reducing direct contact with moist soil. If you choose to line your beds, use landscaping fabric or untreated cardboard at the bottom to suppress weeds whilst allowing drainage. Avoid using plastic sheeting on the bottom as it prevents drainage and can cause waterlogging, which is harmful to vegetable roots.
How do I fill a raised bed for vegetable growing?
Fill your raised bed with a mixture of topsoil and well-rotted compost or manure, typically in a ratio of about 60% topsoil to 40% organic matter. This combination provides nutrients, good drainage, and the loose soil structure vegetables need to thrive. Each year, top up the bed with a fresh layer of compost as the organic matter breaks down and the soil level settles.
Can I build raised beds directly on grass or concrete?
Yes, raised beds can be built on grass, though removing the turf first (as shown in this guide) prevents grass from growing up into your bed and competing with your vegetables. For beds on concrete or paved areas, ensure the bed is deep enough (at least 30cm) and has adequate drainage holes. Building on hard surfaces is an excellent option for renters or those with limited garden space.
How long will wooden raised beds last before needing replacement?
Wooden raised beds typically last between 5-15 years depending on the type of wood used and whether it has been treated with a plant-safe preservative. Hardwoods like oak and cedar naturally resist rot and can last over a decade, whilst treated softwoods generally last 5-8 years. Applying a plant-friendly wood preserver every few years, as mentioned in this guide, helps extend the lifespan of your raised bed construction.
📅 Last updated: